

Are you looking for the Best Exercises To Reduce Fat In Thighs Easily? Well, then you have come to the right place. On this occasion, we want to show you a list of the best physical activities. That will help you to fight the fatness of your fatty legs.
Many people suffer from body fat and obesity. Being such a common problem, we are constantly looking for new and effective methods that help us to eliminate body fat. Therefore, in this opportunity, we will offer you some exercises that will help you to fulfill the proposed aim.
The fat not only usually accumulates in the arms or face, but also in our legs. Don’t worry, because it has a solution. The exercises, which we will give you in an instant, are ideal for both men and women and you can do them at home or in a gym. So, do not move and join us until the end to know all the exercises we want to provide you. With more than talking, let’s move on with the development.
10 Best Exercises To Reduce Fat In Thighs Easily
Best exercises to reduce fat in thighs#1 Jumping Rope
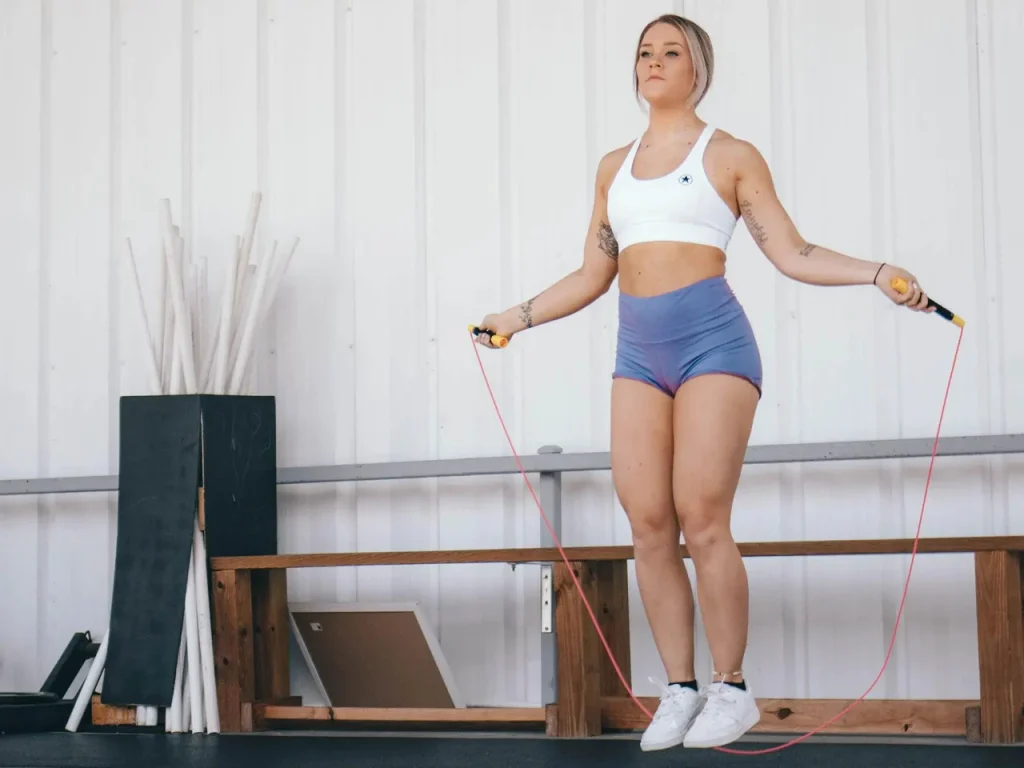
Jumping rope is one of the most effective exercises to eliminate accumulated thigh fat. To be effective, you must join two types of jumps. First, perform 2 sets of 30-50 jumps in static and with your feet together. Second, perform 2 sets of 20-30 jumps in motion jumping first with one foot and then with the other. You will see how quickly you get your legs toned and the fat vanishes without you being aware.
Jumping rope, also known as skipping, is a fantastic cardiovascular exercise that offers numerous health benefits. It’s an efficient way to improve cardiovascular fitness, burn calories, enhance coordination, and strengthen various muscle groups. Here’s a guide to jumping rope effectively:
-
- Select the Right Rope:
-
- Choose a jump rope that suits your height. Stand in the middle of the rope and ensure the handles reach your armpits. Adjustable ropes are ideal for customizing the length.
-
- Select the Right Rope:
-
- Proper Form:
-
- Hold the handles firmly with a comfortable grip, keeping your elbows close to your sides and wrists relaxed.
-
- Jump using the balls of your feet, landing softly to minimize impact. Keep your knees slightly bent and your core engaged.
-
- Proper Form:
-
- Start Slowly:
-
- Begin with a warm-up to prepare your body. Start jumping at a moderate pace, focusing on maintaining good form and rhythm.
-
- Start Slowly:
-
- Practice Basic Jumps:
-
- Start with basic jumps by hopping over the rope with both feet together, ensuring the rope clears under your feet with each jump.
-
- Practice Basic Jumps:
-
- Gradually Increase Difficulty:
-
- Progress to variations like alternating feet, high knees, double unders (where the rope passes under your feet twice in one jump), or criss-cross jumps as you become more proficient.
-
- Gradually Increase Difficulty:
-
- Set a Routine:
-
- Incorporate jumping rope into your workout routine. Start with shorter sessions (e.g., 5-10 minutes) and gradually increase the duration as your stamina improves.
-
- Set a Routine:
-
- Stay Relaxed and Consistent:
-
- Keep your shoulders relaxed and your arms close to your body. Maintain a consistent pace and breathing pattern while jumping.
-
- Stay Relaxed and Consistent:
-
- Safety Considerations:
-
- Ensure you have enough space and a flat, non-slip surface to jump on to prevent tripping or injury.
-
- Wear proper footwear with good support to cushion the impact on your joints.
-
- Safety Considerations:
-
- Cooldown and Stretching:
-
- After jumping, cool down by doing some light stretching exercises to prevent muscle soreness and improve flexibility.
-
- Cooldown and Stretching:
-
- Monitor Progress: Track your progress by noting the duration, and number of jumps, or trying to increase the intensity or complexity of your jumps over time.
Jumping rope can be an effective standalone workout or incorporated into a larger fitness routine. It’s a versatile exercise that offers cardiovascular benefits while also improving agility and coordination. Start slowly, focus on form, and gradually increase the intensity as your skills improve. As with any exercise, listen to your body and avoid overexertion to prevent injury.
MUST READ: 15 Best Green Tea Brand In 2024
Best exercises to reduce fat in thighs#2 Squat jumps
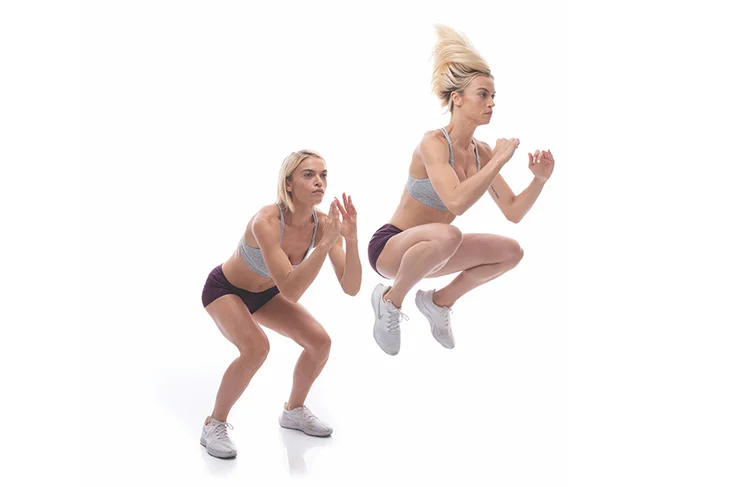
Another essential exercise that is quite tiring but ideal for eliminating accumulated fat is to jump starting from a squat. To do this, squat and jump as high as you can to fall back into a crouch. You must perform 3 sets of 10-15 repetitions. You will see how you tone the quadriceps and increase the heart rate to burn fat.
Squat jumps are an effective and dynamic lower-body exercise that combines a squat motion with a plyometric jump. They target various muscle groups, including the quadriceps, hamstrings, glutes, calves, and core muscles. Here’s a guide on how to perform squat jumps correctly:
-
- Starting Position:
-
- Stand with your feet shoulder-width apart, toes pointing slightly outward. Keep your back straight, and chest up, and engage your core muscles for stability.
-
- Starting Position:
-
- Performing the Squat:
-
- Lower your body into a squat position by bending your knees and pushing your hips back as if you’re sitting down. Keep your weight on your heels and lower your hips until your thighs are parallel to the ground or as far down as is comfortable.
-
- Ensure your knees do not extend beyond your toes and keep your chest lifted throughout the movement.
-
- Performing the Squat:
-
- Executing the Jump:
-
- From the squat position, explode upward using your leg muscles. Propel yourself upward by extending your legs and pushing through your feet.
-
- Swing your arms to gain momentum and height as you jump, raising them in front of you or above your head.
-
- Aim to jump as high as you comfortably can while maintaining control.
-
- Executing the Jump:
-
- Landing Softly:
-
- Land back into the squat position, bending your knees to absorb the impact of the landing. Keep your chest up, maintain balance, and land softly to reduce stress on your joints.
-
- Landing Softly:
-
- Repeating the Exercise:
-
- Immediately upon landing, go into the next repetition by transitioning smoothly into another squat and explosive jump.
-
- Start with a few repetitions (e.g., 8-10) and gradually increase the number as you become more comfortable and proficient with the exercise.
-
- Repeating the Exercise:
-
- Breathing:
-
- Inhale as you lower into the squat position and exhale forcefully as you jump explosively.
-
- Breathing:
-
- Safety Considerations:
-
- Ensure you have enough space and a flat surface to perform squat jumps safely.
-
- Maintain proper form throughout the exercise to avoid injuries, especially to the knees and lower back.
-
- Safety Considerations:
Squat jumps are a high-intensity exercise that can elevate your heart rate and improve lower-body strength and power. Incorporate them into your workout routine to add variety and challenge your muscles. As with any exercise, start gradually, focus on proper form, and listen to your body to avoid overexertion or injury. If you have any existing health conditions or concerns, consult a fitness professional or healthcare provider before attempting new exercises.
Best exercises to reduce fat in thighs#3 Leg raising

The last exercise that we propose is to raise your legs. To do this, you must lie face down carefully and raise the right leg keeping it straight. Hold a few seconds in the air and lower your leg again. Subsequently, perform the same movement with the left leg. You must perform 2 sets of 15-20 repetitions, 10 with each leg.
Leg-raising exercises are effective for targeting the abdominal muscles, particularly the lower abdominals, as well as engaging the hip flexors. There are several variations of leg-raising exercises that you can incorporate into your workout routine. Here are some common leg-raising exercises:
-
- Lying Leg Raise:
-
- Lie flat on your back on an exercise mat or the floor.
-
- Keep your legs straight and together.
-
- Lift your legs upward towards the ceiling while keeping them straight, using your abdominal muscles to raise your hips off the ground.
-
- Slowly lower your legs back down without letting them touch the floor to complete one repetition.
-
- Lying Leg Raise:
-
- Hanging Leg Raise:
-
- Hang from a pull-up bar or sturdy overhead structure with an overhand grip, palms facing away from you.
-
- Engage your core and lift your legs while keeping them straight until they are parallel to the ground or as high as you can comfortably lift them.
-
- Slowly lower your legs back down to the starting position.
-
- Hanging Leg Raise:
-
- Bent Knee Leg Raise:
-
- Lie on your back with your knees bent and feet flat on the floor.
-
- Lift your feet off the ground and bring your knees toward your chest while keeping your lower back pressed against the floor.
-
- Lower your feet back down to the starting position without letting them touch the floor.
-
- Bent Knee Leg Raise:
-
- Side Leg Raise:
-
- Lie on your side with your legs straight and stacked on top of each other.
-
- Lift your top leg toward the ceiling while keeping it straight.
-
- Lower your leg back down to complete one repetition. Switch sides and repeat.
-
- Side Leg Raise:
-
- Flutter Kicks:
-
- Lie on your back with your legs straight.
-
- Lift your legs a few inches off the ground.
-
- Alternately kick your legs up and down in a fluttering motion while engaging your core muscles.
-
- Flutter Kicks:
When performing leg raising exercises:
-
- Focus on using your abdominal muscles to lift your legs rather than relying solely on momentum.
-
- Keep your movements slow and controlled to maximize muscle engagement and minimize strain on your lower back.
-
- Maintain proper form throughout the exercise, and if you experience any discomfort or strain, stop the exercise and consult with a fitness professional or healthcare provider.
Incorporate leg-raising exercises into your overall workout routine for a well-rounded core workout. Vary the exercises and aim for proper form and control to effectively target the abdominal muscles.
Best exercises to reduce fat in thighs#4 Lateral sliding
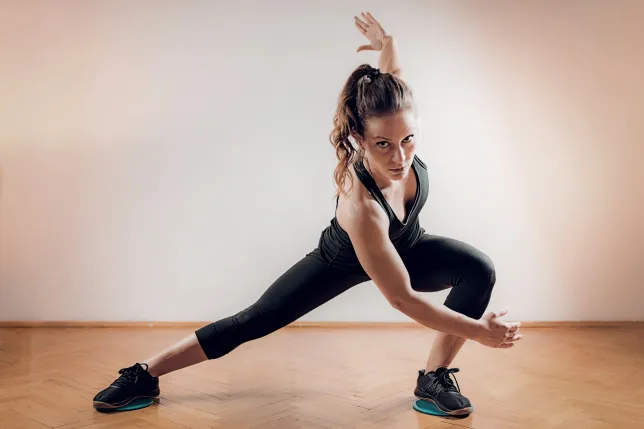
Standing with your legs together, take a wide step to the right while you bend down. I went back to the center and repeated the movement to the left side. Another modality of this exercise is to do the same but keep the leg that does not move straight. Perform 3 sets of 10-15 repetitions.
Lateral sliding, also known as lateral skaters or lateral bounds, is a dynamic exercise that targets the lower body, particularly the hips, thighs, glutes, and calves. This exercise helps improve agility, balance, and lower-body strength while engaging various muscles in a lateral (side-to-side) movement pattern. Here’s how to perform lateral sliding:
-
- Starting Position:
-
- Begin by standing upright with your feet together and knees slightly bent.
-
- Keep your chest up, engage your core muscles for stability, and maintain a slight bend in your hips and knees throughout the exercise.
-
- Starting Position:
-
- Execution:
-
- Take a lateral step to the right side by extending your right leg outward, pushing off with your left foot.
-
- As you land on your right foot, bring your left foot behind your right leg, allowing the left foot to hover above the ground.
-
- Keep your weight on the right leg and maintain balance as you land softly on your right foot, bending your knee to absorb the impact.
-
- Execution:
-
- Continued Movement:
-
- Immediately after landing on the right side, push off with your right foot to perform a lateral slide or bound to the left side.
-
- Extend your left leg outward and bring your right foot behind your left leg, landing softly on your left foot with a slight knee bend.
-
- Continued Movement:
-
- Repeat the Movement:
-
- Continue alternating lateral slides from side to side, mimicking a skating or bounding motion while maintaining control and balance.
-
- Repeat the Movement:
-
- Arm Movement:
-
- Swing your arms in a natural motion opposite to your leg movement to assist in maintaining balance and coordination.
-
- Arm Movement:
-
- Breathing:
-
- Inhale as you prepare to slide to the side, and exhale during the slide, maintaining a steady breathing pattern throughout the exercise.
-
- Breathing:
-
- Safety Considerations:
-
- Perform lateral sliding on a smooth surface to allow for easy sliding without resistance.
-
- Focus on proper form and controlled movements to avoid injury, especially to the knees and ankles.
-
- Safety Considerations:
Lateral sliding is a beneficial exercise for athletes, fitness enthusiasts, and individuals looking to improve lower-body strength, stability, and agility. Start with a few repetitions on each side and gradually increase the number as you become more comfortable with the movement. Incorporate lateral sliding into your workouts as part of a dynamic warm-up, a cardio routine, or a lower-body strengthening exercise. As always, if you have any existing health concerns or injuries, consult with a fitness professional or healthcare provider before attempting new exercises.
Best exercises to reduce fat in thighs#5 Internal leg lift

Lie on your side with your bottom leg stretched and your top leg bent forward. Raise and lower the leg below, trying to squeeze the “chubby” thigh. Do 15-20 repetitions on each leg.
The “internal leg lift” is also known as the “inner thigh lift” or “inner leg raise.” This exercise targets the inner thigh muscles (adductors) and can be performed in different variations. Here’s how to do an internal leg lift:
-
- Lying Inner Leg Raise:
-
- Lie on your side on an exercise mat or the floor. You can support your head with your bottom arm and place your top hand on the floor in front of you for stability.
-
- Keep your bottom leg slightly bent for support and straighten your top leg.
-
- Lift your top leg upward as high as possible without rotating your hips or tilting your pelvis. Ensure the movement is controlled and avoid swinging the leg.
-
- Slowly lower your leg back down to the starting position without allowing it to touch the floor to complete one repetition.
-
- After completing the desired number of repetitions on one side, switch and perform the exercise on the other leg.
-
- Lying Inner Leg Raise:
-
- Seated Inner Leg Raise:
-
- Sit on the edge of a chair or a bench with your back straight and hands placed on the sides for support.
-
- Keeping your back straight, lift one leg off the floor, and then raise it toward your midline (the center of your body), engaging your inner thigh muscles.
-
- Lower your leg back down with control without letting it touch the floor to complete one repetition.
-
- Repeat with the other leg.
-
- Seated Inner Leg Raise:
-
- Standing Inner Leg Raise:
-
- Stand tall and hold onto a stable surface like a chair or a wall for balance.
-
- Lift one leg to the side, keeping it straight or slightly bent, and engage your inner thigh muscles.
-
- Raise your leg to the side as high as comfortably possible, then lower it back down with control.
-
- Repeat with the other leg.
-
- Standing Inner Leg Raise:
When performing the internal leg lift exercises:
-
- Focus on using the inner thigh muscles to lift the leg rather than relying on momentum.
-
- Maintain proper form and controlled movements to effectively target the inner thigh muscles.
-
- Perform the exercises at a pace that allows you to feel the muscles working without straining or compromising your form.
-
- Gradually increase the number of repetitions or sets as you build strength in your inner thighs.
Incorporate these exercises into your workout routine to target and strengthen the inner thigh muscles, helping to improve overall lower body strength and muscle tone. Adjust the number of repetitions and sets based on your fitness level and comfort.
Best exercises to reduce fat in thighs#6 Leg swing
Leg swings are dynamic exercises that involve swinging the legs in controlled movements to improve flexibility, increase the range of motion, and activate the muscles in the lower body. There are different variations of leg swings that can be performed to target various muscle groups. Here are two common types of leg swings:
-
- Forward and Backward Leg Swings:
-
- Stand next to a sturdy support such as a wall, pole, or a workout bench for balance.
-
- For Forward Leg Swings:
-
- While standing on one leg, swing the opposite leg forward as high as comfortable while keeping it straight.
-
- Return the leg backward past the standing leg, maintaining control throughout the movement.
-
- Perform the swings in a fluid, pendulum-like motion without using excessive force.
-
- For Forward Leg Swings:
-
- For Backward Leg Swings:
-
- Start with the same standing position and swing the leg backward as far as comfortable while keeping it straight.
-
- Return the leg forward past the standing leg in a controlled manner.
-
- For Backward Leg Swings:
-
- Perform the desired number of swings on one leg, then switch to the other leg.
-
- Forward and Backward Leg Swings:
-
- Side-to-Side Leg Swings:
-
- Stand facing a stable support for balance, holding onto it with one hand if needed.
-
- For Side Leg Swings:
-
- Swing one leg to the side while keeping it straight, lifting it as high as comfortably possible.
-
- Swing the leg back across the body to the opposite side in a controlled manner.
-
- For Side Leg Swings:
-
- Perform the swings in a smooth, controlled motion without using excessive momentum.
-
- Complete the repetitions on one side before switching to the other leg.
-
- Side-to-Side Leg Swings:
Tips for performing leg swings:
-
- Maintain proper posture and engage your core muscles for stability throughout the exercise.
-
- Perform leg swings in a slow and controlled manner to avoid overstretching or straining the muscles.
-
- Start with smaller swings and gradually increase the range of motion as your muscles warm up and become more flexible.
-
- Focus on using the muscles in your hips, thighs, and lower body to perform the swings rather than relying on momentum.
Leg swings are effective as part of a warm-up routine before engaging in activities that involve the lower body, such as running, jumping, or strength training. They help loosen up the muscles, improve mobility, and can also be used for active recovery after workouts. Adjust the intensity and range of motion based on your fitness level and comfort.
Best exercises to reduce fat in thighs#7 Cross bridge of one leg

“Single Leg Glute Bridge” or a variation of a glute bridge exercise involving only one leg. The glute bridge primarily targets the gluteal muscles (buttocks) and the muscles of the lower back, hamstrings, and core. Performing a single-leg variation adds more challenge and emphasizes one side at a time. Here’s how to perform a single-leg glute bridge:
-
- Starting Position:
-
- Lie on your back on an exercise mat or the floor with your knees bent and feet flat on the ground.
-
- Extend one leg straight out in front of you, keeping the other foot firmly planted on the ground.
-
- Starting Position:
-
- Execution:
-
- Engage your core and push through the heel of the foot that remains on the ground to lift your hips off the floor.
-
- Lift your hips until your body forms a straight line from your shoulders to the extended knee.
-
- At the top of the movement, your body weight should be supported by the foot on the ground and your upper back (between your shoulder blades).
-
- Ensure you’re squeezing your glutes at the top position to maximize muscle engagement.
-
- Execution:
-
- Lowering Phase:
-
- Lower your hips back down to the starting position with control, maintaining tension in your glutes and hamstrings.
-
- Avoid dropping your hips too quickly to the ground; instead, lower them in a controlled manner to complete one repetition.
-
- Lowering Phase:
-
- Repetitions:
-
- Complete the desired number of repetitions on one leg before switching to the other leg.
-
- Repetitions:
Tips for performing single-leg glute bridges:
-
- Keep your core engaged throughout the exercise to maintain stability and prevent excessive arching in the lower back.
-
- Focus on driving through the heel of the foot on the ground to engage the glutes more effectively.
-
- Maintain a straight line from your shoulders to your knees at the top of the movement.
-
- Control the movement throughout the exercise, emphasizing the contraction of the glutes.
-
- Start with a manageable number of repetitions and sets based on your fitness level and gradually increase as you get stronger.
Single-leg glute bridges are an effective exercise for strengthening the glutes and improving hip stability. They can be incorporated into lower-body or glute-focused workouts to enhance strength and muscle activation in the posterior chain. Adjust the number of repetitions and sets according to your fitness goals and capabilities.
Best exercises to reduce fat in thighs#8 The heel lift in the sumo squat

In sumo squat position (open squat) raise and lower each heel as much as you can. Remember to do the squat quite deep. Do 30 repetitions on each side.
In the sumo squat exercise, the heel lift refers to raising the heels while performing the squat movement. The sumo squat is a variation of the traditional squat that targets the muscles in the lower body, particularly the quadriceps, inner thighs, glutes, and hamstrings. Adding a heel lift to the sumo squat can further engage specific muscles and provide variation in the exercise. Here’s how to perform a sumo squat with a heel lift:
-
- Starting Position:
-
- Stand with your feet wider than shoulder-width apart and toes pointed outward at an angle (similar to a sumo wrestler’s stance).
-
- Keep your back straight, and chest up, and engage your core muscles for stability.
-
- Starting Position:
-
- Execution:
-
- Lower your body down by bending your knees and pushing your hips back, as if you’re sitting in an imaginary chair. Keep your knees aligned with your toes.
-
- As you descend into the squat, lift your heels off the ground, shifting your weight onto the balls of your feet.
-
- Focus on keeping your chest lifted, maintaining good posture, and engaging your thigh and glute muscles throughout the movement.
-
- Execution:
-
- Squat Depth and Return:
-
- Lower yourself down until your thighs are parallel to the ground or as far down as comfortable, ensuring your knees are tracking over your toes without going past them.
-
- Hold the lowered position for a moment, then press through the balls of your feet to return to the starting position, simultaneously lowering your heels back to the ground.
-
- Squat Depth and Return:
-
- Repetitions:
-
- Perform the desired number of repetitions while maintaining control and stability throughout the exercise.
-
- Repetitions:
Tips for performing sumo squats with a heel lift:
-
- Ensure your knees are in line with your toes throughout the movement to avoid unnecessary stress on the knee joints.
-
- Focus on a slow and controlled descent into the squat to maintain proper form and balance.
-
- Engage your core muscles to stabilize your body and prevent leaning too far forward or backward.
-
- Avoid letting your heels lift excessively high; instead, lift them just enough to feel the engagement in the calves and thighs.
Sumo squats with a heel lift can provide an additional challenge by targeting the calves, increasing activation in the lower body muscles, and improving ankle mobility. Gradually increase the number of repetitions and sets as your strength and comfort with the exercise improve. Adjust the depth of the squat according to your flexibility and comfort level.
Best exercises to reduce fat in thighs#9 Side Lunge
The side lunge is an effective lower-body exercise that primarily targets the quadriceps, hamstrings, inner thighs (adductors), and glutes. It’s a great functional movement that helps improve lower body strength, flexibility, and balance. Here’s how to perform a side lunge:
-
- Starting Position:
-
- Stand tall with your feet together and arms at your sides or placed on your hips for balance.
-
- Starting Position:
-
- Execution:
-
- Take a wide step to the side with your right foot, ensuring your feet are wider than shoulder-width apart.
-
- Execution:
-
- Lateral Movement:
-
- Shift your body weight to your right leg as you bend your right knee, pushing your hips back as if sitting in a chair.
-
- Lateral Movement:
-
- Lunge Descent:
-
- Lower your body by bending your right knee while keeping your left leg straight. Aim to lower your hips until your right thigh is parallel to the ground (or as far as is comfortable) while maintaining a flat back and keeping your chest lifted.
-
- Lunge Descent:
-
- Pushing Back:
-
- Push through your right heel to return to the starting position, straightening your right leg and bringing your feet back together.
-
- Pushing Back:
-
- Repetition:
-
- Complete the desired number of repetitions on one side before switching to the other side.
-
- Repetition:
Tips for performing side lunges:
-
- Keep your chest up and maintain a neutral spine throughout the movement to avoid leaning too far forward or rounding your back.
-
- Focus on proper form and controlled movements rather than speed.
-
- Ensure your knees are aligned with your toes and do not extend past your toes during the lunging motion to protect your knees.
-
- Engage your core muscles for stability and balance throughout the exercise.
-
- You can alternate sides with each repetition or complete all repetitions on one side before switching to the other side.
Side lunges can be incorporated into lower-body workouts or as part of a dynamic warm-up routine. They offer variety in training the lower body muscles and can be modified by adding weights or resistance for increased intensity as you progress in strength and stability.
Best exercises to reduce fat in thighs#10 Donkey kicks

Start in a four-point position with your legs flexed at 90º. You will do four movements: raise, open, close, and lower (this counts as a repetition). Do it with your foot in flex. Do 20 repetitions per side.
Donkey kicks are a popular bodyweight exercise that primarily targets the glutes (buttocks) and the lower back. It’s a straightforward exercise that can be performed without any equipment. Here’s how to do donkey kicks:
-
- Starting Position:
-
- Begin on all fours, with your hands positioned directly under your shoulders and your knees under your hips. Your back should be flat, and your head should be in a neutral position.
-
- Starting Position:
-
- Execution:
-
- Engage your core muscles to maintain stability. Keeping your right knee bent at a 90-degree angle, lift your right foot toward the ceiling, pushing upward through the heel.
-
- Execution:
-
- Extension:
-
- Straighten your right leg and aim to lift your foot directly upward while maintaining the position of your knee. Focus on squeezing your glutes at the top of the movement to maximize engagement.
-
- Extension:
-
- Lowering Phase:
-
- Slowly lower your right leg back to the starting position, maintaining control throughout the movement.
-
- Lowering Phase:
-
- Repetition:
-
- Complete the desired number of repetitions with your right leg before switching to your left leg.
-
- Repetition:
Tips for performing donkey kicks:
-
- Keep your back flat and avoid arching or rounding your spine during the exercise to prevent unnecessary strain on your lower back.
-
- Engage your core muscles throughout the movement to stabilize your body.
-
- Focus on controlled movements rather than speed. Ensure proper form and feel the contraction in your glutes with each repetition.
-
- Keep your neck in a neutral position and avoid straining it by looking up or down excessively.
Donkey kicks are an effective exercise for targeting the glute muscles and can be included in lower-body or glute-focused workouts. You can adjust the number of repetitions and sets based on your fitness level and goals. Variations such as adding resistance bands or ankle weights can increase the intensity of the exercise as you progress.
Thanks for reading my article. Discover the ultimate guide on how to achieve leaner and toned thighs effortlessly! In this video, we share practical and effective tips to help you reduce fat in your thighs without extreme diets or strenuous workouts. Don’t forget to like, subscribe, and hit the bell for more fitness tips and tricks. Let’s embark on this journey to sculpted thighs together! https://youtu.be/vi5agACsxi8